If you use an Android device, you’ve undoubtedly noticed that it’s easiest to manage your contacts from your Google account. But what if your record-keeping system for contacts is Microsoft Outlook, which doesn’t sync with Google?
If you have a Mac, the whole process is complicated but it doesn’t require manual effort once it’s set up.
So, let’s assume for a moment that you have Outlook running on Windows. In this scenario, you have three options:
- You can use the open source sync application Go Contact Sync Mod
- You can export your contacts in a comma-separated values (CSV) file and import it to Google without your contact photos, or
- You can export your individual contacts as vCards and import them to Google with the contact photos
If you choose to use the open source application, there is documentation on their web site, so we won’t cover that here. But let’s go through the other two methods.
Importing your contacts with a CSV file
This is the easiest method, but you can’t import the contact photos to Google this way. If you find it easier to look for contact on your phone by their photo, it’s probably not the optimal method.
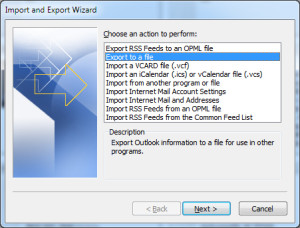
First, open Outlook and view your contacts. Click on File, Open, then Import. You’ll find all of the import/export options in the resulting dialog box (below). Select Export to a file.
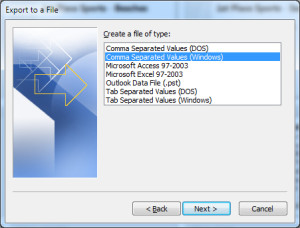
Click Next and you’ll see a list of the type of exports you can do. Select Export to Comma-Separate Values (Windows).
Click Next twice and give your file a name. Then click Finish to create the CSV file that you’ll import to Google.
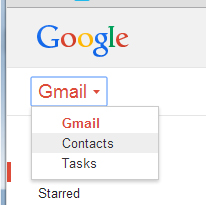
Log in to your Google account and switch to your Contacts view. You can do this by clicking GMail and changing this value to Contacts.
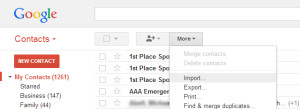
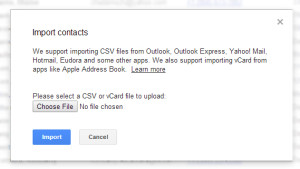
Once your contacts load, click Import under the More menu.
Now you’ll see the Import Contacts dialog box. Click on Choose File and select the file you just exported from Outlook.
Click Import to load them to your Google Contacts.
Remember that this is was an export/import and there is no synchronization between the two systems (Outlook and Google). If you want to refresh your contacts, you’ll need to either delete them and re-import, or re-import and merge the resulting duplicates.
Importing your contacts using a vCard file
First, you’ll need to export each of your contacts as vCards. This will require a macro, but we’ll walk you through the process.
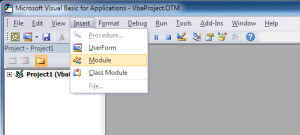
First, open your Visual Basic Editor (VBE) by pressing Alt+F11. Once the VBE opens, click Insert and then Module. This is where we’ll add the Visual Basic for Applications (VBA, also known as a macro) code.
Paste the following code into the module window:
Sub Export_PAB_to_vcfs()
Dim myOlApp As Outlook.Application


Dim objContact As ContactItem

Set myOlApp = New Outlook.Application

Set objAddressList = myOlApp.Session.AddressLists("pvt_Contacts")

Set olns = myOlApp.GetNamespace("MAPI")
    	' Set MyFolder to the default contacts folder.
Set myFolder1 = olns.Folders("Personal Folders")
Set myFolder = myFolder1.Folders("Contacts")

   	 ' Get the number of items in the folder.
NumItems = myFolder.Items.count

' Loop through all of the items in the folder.
For i = 1 To NumItems
    Set objContact = myFolder.Items(i)
    If Not TypeName(objContact) = "Nothing" Then
        If Not objContact.FullName = "" Then
            strName = "C:\myContactsVCard\" & objContact.FullName & ".vcf"

            objContact.SaveAs strName, olVCard
        End If
    End If
Next

MsgBox "All Contacts Exported!"

End Sub
Add a directory called myContactsVCard on your C drive.
Close the VBE and press Alt+F8 to display the macros. Select Export_PAB_to_vcfs and click Run to run the macro.
Once it finishes, you’ll get a dialog box that indicates the number of contacts that were exported.
Now press Ctrl+R to open a Run dialog and enter ‘cmd’ and press Enter to open a command prompt. Type the following, pressing Enter after each line
- cd ../..
- cd myContactsVCard
- copy *.vcf all.vcf
Now go to Google Mail and view your contacts. Click Import under More (see above for a screen shot of this) and choose the file all.cvf that you just created. When it’s finished uploading, all of your Outlook contacts will be in Google, along with their contact photos.
Troubleshooting
If you get an error message stating that you macros are disabled, follow these steps to enable them:
- In Outlook, click File and then Options to bring up the Outlook Options dialog box
- On the left navigation area, click Trust Center
- Click Trust Center Settings to edit the options
- On the left navigation area, click Macro Settings
- Set all macros to load with a notification
- Exit Outlook (Click on File and then Exit) and restart it to load the new settings
